(SECURITY) A few UFW Firewall tips
using the Uncomplicated Firewall
by @admin, may 18, 2023, 09:13am utc

UFW
To install UFW type
ctrl+alt t to open a terminal and sudo apt-get install ufw to install it.
UFW is very easy to use. There are plenty of sites that cover using UFW (see linode and marksei); but we just wanted to point out a couple of important tips.
First let's look at a very simple UFW list.
$ sudo ufw status numbered will list your current allows & blocks, preceded by the numbered order, like this:
$ sudo ufw status numbered
Status: active
To Action From
[ 1] Anywhere DENY IN 169.254.100.1
[ 2] Anywhere DENY IN 10.0.0.134 # vendor laptop
[ 3] Anywhere DENY IN 35.82.92.68 # .amazon aws
[ 4] Anywhere DENY IN 44.241.38.244 # .amazon aws
[ 5] Anywhere DENY IN 52.89.115.53 # .amazon aws
[ 6] 10.0.0.134 DENY OUT Anywhere (out) # vendor laptop
[ 7] Anywhere ALLOW IN 10.0.0.0/24
[ 8] 35.82.92.68 DENY OUT Anywhere (out) # .amazon aws
[ 9] 34.149.157.221 DENY OUT Anywhere (out) # google user
[10] 44.241.38.244 DENY OUT Anywhere (out) # .amazon aws
[11] 443 ALLOW IN Anywhere
[12] 443 ALLOW OUT Anywhere (out)
(etc)
We'll go over this in more detail in a bit, but the basics of each line is:
[The line number]; the affected IP range/port; the action to take; the ip/port range to watch for; and an optional # comment.
The DENY IN actions deal with what can come into your machine; while the DENY OUT actions control what can get from your machine, back out. The whole thing is quite powerful; and easy to use; but there are some things to watch out for. Here are a few of them.
TIP 1: The Order Of The Rules Matters
The ORDER that you enter UFW rules means everything. When the rules are processed, the first match from the top with the incoming (or outgoing) IP request is the one that will be used. Subsequent rules that might match are then ignored. So you want to be careful not to open things up too much in the first few rules.
Let's take a look at this and see how the order of these rules affects things.
If (like a lot of people) you start by allowing HTTP access, which is through port 80, you would enter:
$ sudo apt-get install ufw
$ sudo ufw enable
$ sudo ufw allow 80 # This will also add a second record for IPv6 port 80 as well.
and then start to deny IPs if need be:
$ sudo ufw deny from 123.123.123.123 to any
finally, list out what you have done so far:
$ sudo ufw status numbered
Status: active
To Action From
[ 1] 80 ALLOW IN Anywhere
[ 2] Anywhere DENY IN 123.123.123.123
[ 3] 80 (v6) ALLOW IN Anywhere (v6)
The 123.123.123.123 block is added to the end of your (IPv4) ufw rules as shown above. Subsequent incoming port 80 (http) requests from 123.123.123.123 will actually be *allowed* because the IP is first tested against the "allow any 80" rule and it gets through at that point.
To correct this, insert new individual ip blocks BEFORE the global allow and denys. So, to correct the list above, type:
$ sudo ufw delete 2
$ sudo ufw insert 1 deny from 123.123.123.123 to any
$ sudo ufw status numbered
Which results in:
Status: active
To Action From
[ 1] Anywhere DENY IN 123.123.123.123
[ 2] 80 ALLOW IN Anywhere
[ 3] 80 (v6) ALLOW IN Anywhere (v6)
Now when the IP 123.123.123.123 tries to access your machine it will hit rule [ 1] and be blocked BEFORE the global [ 2] ALLOW 80 rule is hit.
You can use this delete, insert sequence to nicely order the IPs that you allow or block; making it easy to see what you have when scanning the list.
TIP 2: Comments
You can comment your ufw rules, making it easy to know why you did things later on.
$ sudo ufw insert 1 deny from 123.123.123.122 to any comment ".cn, China"
$ sudo ufw status numbered
Status: active
To Action From
[ 1] Anywhere DENY IN 123.123.123.122 # .cn, China
[ 2] Anywhere DENY IN 123.123.123.123
[ 3] 80 ALLOW IN Anywhere
[ 4] 80 (v6) ALLOW IN Anywhere (v6)
This is handy if you are unsure about an IP, and want to revisit it later.
Adding `comment ".cn, recheck after 2023-10"` is one way to mark it as such.
TIP 3: Blocking Ranges
You can block ranges of IPs with ufw.
This is useful if you start to recognize a pattern in say spam, coming from 123.123.123.1 and .2 and .3 and .4. It is likely that many of the IPs in the range of 123.133.123.0 - 123.123.123.255 will also be spammers. If that range happens to be in a country (see tip 5) whose language you do not speak (or sell to); then it starts to be OK to block that whole .0 - .255 range.
To block any IP in the range of 123.123.123.0 to 123.123.123.255 (aka 123.123.123.\*) use:
$ sudo ufw insert 1 deny from 123.123.123.0/24 to any
Similarly, to block:
123.123.\*.\* use:
$ sudo ufw insert 1 deny from 123.123.123.0/16 to any
For 123.\*.\*.\* use:
$ sudo ufw insert 1 deny from 123.123.123.0/8 to any
Note: Be very careful with these, because you are blocking a wide range of ip addresses with them.
TIP 4: Calculating Ranges
See this post for calculating the ranges to block.
TIP 5: Finding Where An IP Is From
geoiplookup (
sudo apt-get install geoiplookup ) is used to show you the country that an IP is from.
For example:
$ geoiplookup 66.45.225.196 returns:
$ geoiplookup 66.45.225.196
GeoIP Country Edition: US, United States
Also helpful is host which will show the domain name associated to an IP:
$ host 66.45.225.196
196.225.45.66.in-addr.arpa domain name pointer www.lavojo.org.
TIP 6: Yes Virginia, There Is A GUI Version
Finally, even though the command line ufw command is powerful, easy to use, and can be scripted to do even more advanced things; there is also a GUI version that you can try, called gufw (
$ sudo apt-get install gufw ).
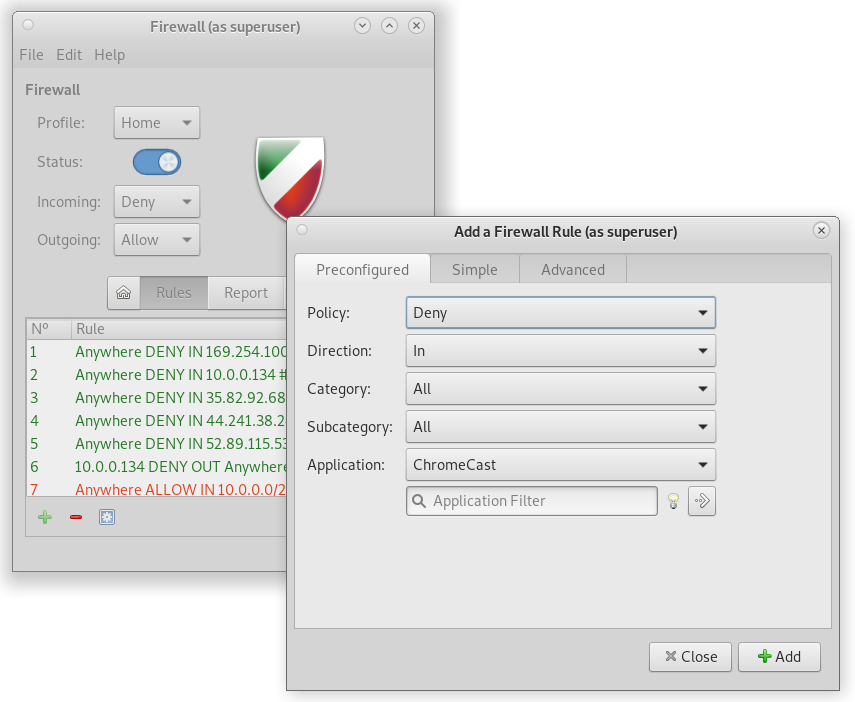
gufw
There are some nice features in gufw, like the ability to add rules per application — which is shown above. The "Advanced" tab is where you would put in a IP; or a range of IPs; while the "Simple" tab allows rules for ports or named services, like "http".
tags: Advanced users, Security related